Monday, August 27, 2012

Photoshop Tutorial #5: HDR - the quick and dirty...

Ok, so anyone with any moderate interest in stepping beyond the tortured, perfectly centered subject, point-and-click shot would have come across HDR (High Dynamic Range) photography.  HDR is a photo technique (increasing in popularity due to the over-abundance of digital photography and post-production image editing software) where a combination of exposures (under, balanced and over) generate a single image displaying an almost surreal range of tonal values - very dramatic shadow and highlight detail. 
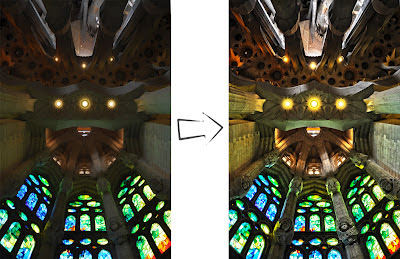
Here we go, a before and after shot form my trip to the Sagrada Famila in Barcelona (Yes, I'm aware that its centered, but i had to lay on the floor, desperately dodging the sock-sandal clad hooves of the ambling herds of crispy-fried tourists, to get this shot!)

NOTE: this is only available for Photoshop CS5 and up...
 

I've done quite a few of these on older CS versions - though i had to shoot 5 exposures of the same shot, while using a tripod - but that is for another time...

  1. Select a regular digitized photograph.
  2. Adjust it accordingly – rotate, scale and crop as desired.
  3. With the Background layer selected, navigate to:  Image>Adjustments>HDR Toning…
    NOTE. This part is a bit tricky – and does warrant some trial and error.  The degree to which each of the specific sliders need to be adjusted depends entirely on the type of image – outside landscape, human close-up,  flashy car, etc. (When working with an inside shot, the main focus is on the amount of light (preferable natural) entering the enclosed structure, and how it illuminates the immediate surroundings).
  4. In the HDR window, I adjusted the sliders as shown (I always start with the Detail slider –matter of preference):
    Tone and Detail: brings out the fine detail of the image – basically sharpening the information that are usually washed out in the shadows and highlights. For a nice rich contrast on dimly lit interiors, a reduced Gamma and Shadow, along with a slightly elevated Exposure and Highlight brings out the most dramatic contrast.
    Color: I like to keep the Saturation at reasonable levels (especially when printing the shot later) and only push up the Vibrance to boost specific hues.Edge Glow: brings out the sharpness of the image – the lower the Radius the sharper the image detail becomes (Strength controls the intensity of the highlight glow).

  5.  Once satisfied with the results then click OK.
  6. The image now has dramatic detail but the contrast in the lighting seems a tad diminished – Levels will easily remedy this.
  7. Select Image>Adjustments>Levels…
  8. In the levels pop-up window, on the histogram,  adjust the dark (left) slider toward the right – to intensify the shadow areas, and move the light (right) slider towards the left a bit to boost the highlights slightly – click ok.
  9. Finally, I like to apply a little Gaussian Blur to take down the crispness a hair – I find a value between 0.8 and 1.2 does just nicely.
  10. If the image has lights in it, creating a faint, blurred halo always adds  a simple, yet dramatic effect…  

Tuesday, August 14, 2012

Zombie Pandemic First Response Kit

As the post title indicates, this is a First Response kit...
not to be mistaken with the gun-behind-glass survival kits, or lame made-in-china novelty throw-away packs, which one can acquire at any old comic store for an insanely overpriced amount...

This kit is a collection of the basic tools necessary to make the first few weeks of chaos, ensuing the initial news of a zombie pandemic, a little more survivable (assuming there's enough sustenance around the home to ensure sufficient energy to use these tools properly)...prior to venturing out for better weapons, more food and stronger fortifications.

So...fill the sinks and tubs with water, gather up all your food, secure all exits and hunker down until the sirens and screams stop...


CONTENTS
  • 18 inch steel machete (US Army)
    silent and needs no reloading, great to keep the dead and/or nosy delinquents at bay.
  • Bic lighter (x2)
    power is the first to fail - Bics are light and never fail to start a fire
  • Compass
    best way to find ones bearings when technology and power are history
  • Permanent markers (x2)
    great for emergency communications and warnings
  • Mag-lite (mini)
    energy efficient and damn tough
  • Basic first aid kit
    NOTE: will not help when infected! However, great to treat small surface wounds from become an easy point of entry for a variety of germs and bacteria.
  • Pocket AM/FM radio
    to stay up-to-date with the news, evacuation sites, and survivor pockets.
The contents are neatly packaged in an easily accessible hand-crafted wooden crate (featuring a hinged side door) with a glass front-facing display window. the kit is lined with a bright green felt (for visibility) and all items are contained with strong Velcro straps.

I have built several at $200 a piece...and even if there is no pandemic of the living-dead in our immediate future, these kits make for a unique addition to any office, game room or man-cave!


Friday, July 27, 2012

Technical Difficulties


Dear Readers,

as a direct result of the past months' pack-in-as-much-as-possible work challenge, and the ensuing sensory overload, my laptop as well as myself are experiencing severe technical difficulties...

luckily, there is a cure for the mind and body...

look for new material coming in August!

Tuesday, June 12, 2012

Photoshop Tutorial #4: Bokeh - light-painting


I was not able to be very creative this week due to a crazy work schedule...just incase you may find this post somewhat blah...

Bokeh, from the Japanese term for haze, is an image (usually in photography) composed of the aesthetic quality of out-of-focus or blurred points of light - i know this is kinda two years ago, but it still creates a simple and pleasant wallpaper...

 ...i used the colors from my logo, troublefish, for the base colors (and the image is part of my hero graphic from my portfolio site)...

...here we go!


1.       Create a new transparent document.
This becomes the bokeh brush.

a.   Using the ellipse tool, create a perfect circle
in black in the center of the document.


b.   Select the layer and open up the blending options
window (click the icon – fx – at the bottom of the
layers window – choose blending options…, or
select: Layer>Layer Styles>Blending Options…).


c.   The blending options window opens; find the
Advanced Blending
section and move the
opacity
slider to 50%.

                        i.      In the blending options window,
 select Stroke – set size to 12,
 position to Inside.

                       ii.      Click OK.


d.   Convert the layer into a smart object
(Layer>Smart Objects>Convert to Smart Object).


e.   Make it into a brush stroke (Edit>Define Brush
Preset…
)– now name it.  NOTE: Remember the
number that appears directly below the brush picture
(here it’s 222).


f.    Select the brush tool (Ctrl B) from the tools menu.

g.   Open the brushes window (Window>Brush).
 
                       i.     Select the brush created in the steps above
(either use its number or mouse over for the saved name).

                      ii.     Set spacing to around200%.

                     iii.     Select Shape Dynamics and set minimum diameter to 50%.

                     iv.     Select Scattering and set scatter to Both Axes
at 1000%, and count to 4.

                      v.     Select Transfer and set Opacity Jitter and
Flow Jitter to 50%.


 h.    Save and close.


2.   Create a new document; fill the backdrop with a dark grey
(i.e. hex# 303030). This is the canvas.


3.   Return to the canvas document and create a new layer.
Result: Layer1: grey background | Layer2: color gradient
4.   Create a diagonal color gradient across the new layer.
5.   Select the color gradient layer and change its blend mode
to overlay.


6.   Create a new layer group between the 2 layers and set
its blending mode to Color Dodge.

Result:
Layer1: grey background |Layer Group 1 |
Layer2: color gradient


7.   In the group create a new layer.
 a.    Select the brush tool (Ctrl B) from the tools menu.
 b.    Select the created bokeh brush.
 c.    Set the brush size around 300.
 d.    Set the foreground color to white.
 e.    Paint first layer of bokeh.
  f.    Apply a Gaussian Blur filter of 10px to the layer.
 g.    Set the layer opacity to 60%.

8.   In the same group create a second new layer.
 a.    Select the brush tool (Ctrl B) from the tools menu.
 b.    Select the created bokeh brush.
 c.    Set the brush size around 200.
 d.    Set the foreground color to white.
 e.    Paint second layer of bokeh.
  f.    Apply a Gaussian Blur filter of 4px to the layer.
 g.    Set the layer opacity to 80%. 

9.   In the same group create a third new layer.
 a.    Select the brush tool (Ctrl B) from the tools menu.
 b.    Select the created bokeh brush.
 c.    Set the brush size around 100.
 d.    Set the foreground color to white.
 e.    Paint second layer of bokeh.
  f.    Apply a Gaussian Blur filter of 2px to the layer.
 g.    Set the layer opacity to 100%.

10. To enhance the backdrop, add an image or logo.

11. Save and close.


Friday, June 1, 2012

Recycled Mason Jar and Palette Planters

I caught this idea in passing on pinterest...looked easy in theory, then again practice makes perfect.
  1. add a drainage hole: with a glass/tile bit, drill a hole into the bottom of the jar - careful - the bit and jar get HOT, and may shatter under too much pressure (this takes about 30 minutes)
  2. take apart the wooden loading palette. 
  3. attach large enough hose clamps to a length of the separated palette wood with 2 screws.
  4. wrap 2 to 3 layers of electrical tape around the area of the jar to be clamped - this protects the glass from shattering as the metal flexes with the changing outside weather conditions.
  5. place jar into the clamp and tighten it.
  6. wrap a wire around the top of the jar and attach it to a screw on the back of the plank.
  7. replace the lid ring  (if your jar has one).
  8. mount wood plank in a sunny area.
  9. add river rock to the bottom of the jar to allow for water drainage - fill with potting soil.
  10. plant something... 
I made 6 thus far - 3 jars per wood plank - each growing a different herb...