
Ok, so anyone with any moderate interest in stepping beyond the tortured, perfectly centered subject, point-and-click shot would have come across HDR (High Dynamic Range) photography. HDR is a photo technique (increasing in popularity due to the over-abundance of digital photography and post-production image editing software) where a combination of exposures (under, balanced and over) generate a single image displaying an almost surreal range of tonal values - very dramatic shadow and highlight detail.
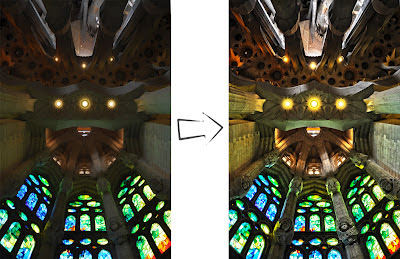 Here we go, a before and after shot form my trip to the Sagrada Famila in Barcelona (Yes, I'm aware that its centered, but i had to lay on the floor, desperately dodging the sock-sandal clad hooves of the ambling herds of crispy-fried tourists, to get this shot!)
NOTE: this is only available for Photoshop CS5 and up...
I've done quite a few of these on older CS versions - though i had to shoot 5 exposures of the same shot, while using a tripod - but that is for another time...
 Here we go, a before and after shot form my trip to the Sagrada Famila in Barcelona (Yes, I'm aware that its centered, but i had to lay on the floor, desperately dodging the sock-sandal clad hooves of the ambling herds of crispy-fried tourists, to get this shot!)
NOTE: this is only available for Photoshop CS5 and up...
I've done quite a few of these on older CS versions - though i had to shoot 5 exposures of the same shot, while using a tripod - but that is for another time...
- Select a regular digitized photograph.
- Adjust it accordingly – rotate, scale and crop as desired.
- With the Background layer
selected, navigate to: Image>Adjustments>HDR Toning…
NOTE. This part is a bit tricky – and does warrant some trial and error. The degree to which each of the specific sliders need to be adjusted depends entirely on the type of image – outside landscape, human close-up, flashy car, etc. (When working with an inside shot, the main focus is on the amount of light (preferable natural) entering the enclosed structure, and how it illuminates the immediate surroundings).
- In the HDR window, I adjusted the sliders as shown (I always
start with the Detail slider –matter
of preference):
Color: I like to keep the Saturation at reasonable levels (especially when printing the shot later) and only push up the Vibrance to boost specific hues.Edge Glow: brings out the sharpness of the image – the lower the Radius the sharper the image detail becomes (Strength controls the intensity of the highlight glow).
 Tone and Detail: brings
out the fine detail of the image – basically sharpening the information that
are usually washed out in the shadows and highlights. For a nice rich contrast
on dimly lit interiors, a reduced Gamma and
Shadow, along with a slightly
elevated Exposure and Highlight brings out the most dramatic
contrast.
Tone and Detail: brings
out the fine detail of the image – basically sharpening the information that
are usually washed out in the shadows and highlights. For a nice rich contrast
on dimly lit interiors, a reduced Gamma and
Shadow, along with a slightly
elevated Exposure and Highlight brings out the most dramatic
contrast.
- Once satisfied with the results then click OK.
- The image now has dramatic detail but the contrast in the lighting seems a tad diminished – Levels will easily remedy this.
- Select Image>Adjustments>Levels…
- In the levels pop-up window, on the histogram, adjust the dark (left) slider toward the right – to intensify the shadow areas, and move the light (right) slider towards the left a bit to boost the highlights slightly – click ok.
- Finally, I like to apply a little Gaussian Blur to take down the crispness a hair – I find a value between 0.8 and 1.2 does just nicely.
-
If the image has lights in it, creating a faint, blurred halo always adds a simple, yet dramatic effect…


